The API Server is one of the fundamental component of a Kubernetes cluster. All operations and communications between components, and external user commands are REST API calls that the API Server handles. Let’s try to understand how to authenticate and authorize the Kubernetes API with Azure Active Directory and Kubernetes RBAC.
The aim of this post is to explain you how to:
- Deploy an AAD integrated Kubernetes Cluster
- Create a Secret and ServiceAccount, Role and RoleBinding in order to access only that secret
- Run a Node.js Web Application in a Pod accessing the secret through the newly created ServiceAccount
First of all, if you never heard about Azure Active Directory or Kubernetes RBAC (Role Based Access Control) or have some doubts while reading this article, I suggest you to read carefully the following pieces of documentation:
Let’s start
In Kubernetes, you must authenticate (a.k.a. “log in”) before the API Server can authorize your request (a.k.a. grant permission). As a result, first of all we are going to provide the cluster a secure authentication system with Azure Active Directory, then we will use Role Based Access Control to manage the authorization part.
Azure Container Service Engine - Kubernetes AAD integration
Due to work in progress with Azure Container Service (AKS), at the time of writing, the only way to provide Azure Active Directory Authentication to a Kubernetes Cluster in Azure is to use ACS-Engine.
Prerequisites for the AAD authenticated cluster creation
Before actually deploying your Kubernetes cluster, you should create:
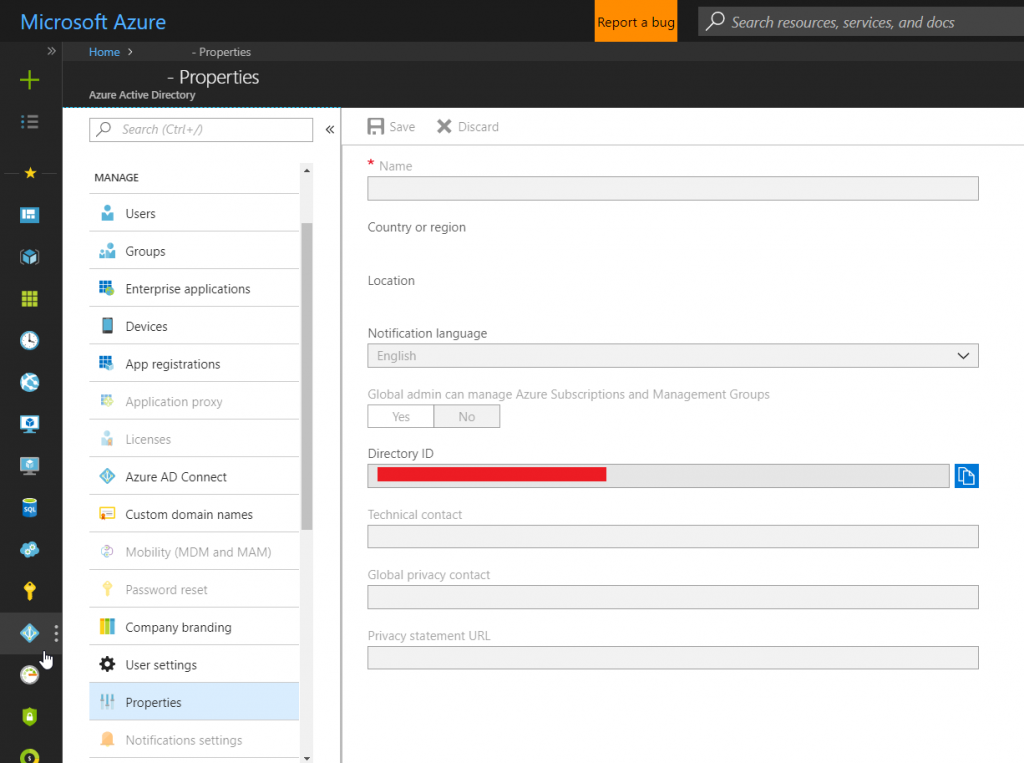
- An Azure Active Directory tenant (you can use the same tenant for your Azure subscription). If on Azure, you can find the tenant id going to Azure Active Directory -> Properties -> Directory ID
- One “Web App / API” AAD application which will represent the API Server
- A “Native” AAD application with delegated permission to the previously created AAD Application
Cluster template generation and cluster deployment
If you have never created a cluster using ACS-Engine, I suggest you to take a look at this deployment guide
Using the data from the previously created AAD applications, you have to define, under the properties section of your cluster definition, an aadProfile object. Your cluster definition should look similar to this one:
| |
Recommendation: If you want, you can enable encryption of secret data at rest in Kubernetes using Azure Key Vault. In order to do that, you should set the enableEncryptionWithExternalKms flag to true under the orchestratorProfile.kubernetesConfig property. At the time of writing, the project is still in alpha stage and is supported only for Kubernetes 1.10+ Clusters. If you want to know more about it, please click here
When the cluster definition is ready for deployment, issue an “acs-engine deploy” command; this will deploy the cluster to the Azure subscription and generate an _output folder containing the kubeconfig file. Note that this kubeconfig is not associated with any AAD user yet.
To operate the cluster using your Azure Active Directory identity you need to:
- copy _output//kubeconfig/kubeconfig..json into $HOME/.kube/config
- issue any kubectl command (i.e. “kubectl cluster-info”)
- follow the instructions to login via the web interface at microsoft.com/devicelogin
- notice that the cluster is locked down by default, so when you will log, you will receive a “Forbidden” error
- SSH into master and issue the following, properly replacing the User URI with the one received in the previous error
1kubectl create clusterrolebinding aad-default-cluster-admin-binding --clusterrole=cluster-admin --user 'https://sts.windows.net/<guid-here>/#<guid-here>' - issue any kubectl command again since you should not have authorization issues now
Create a secret and Service Account, Role and Rolebinding
Right now, the cluster is up and running and the API Server is accessible only with your AAD identity.
You can now create a secret using this identity: or issueing a “kubectl create secret” command or deploying a YAML containing the base64 encode of your secret value.
| |
For security reasons, it is important that your web application is able to access only that secret (or a predefined list of secrets) without being able to access other secrets (i.e. connection strings to other databases or storage accounts which are not under that website authority).
To define the right jurisdiction you need a ServiceAccount role binded to a Role which only grants the authorization for the “get” verb to the specific previously created secret.
From the Kubernetes.io website: Service Account: “When processes inside Pods access the cluster, they are authenticated by the API server as a particular service account, for example, default. When you create a Pod, if you do not specify a service account, it is automatically assigned the default service account in the same namespace” “RBAC utilizes roles, which contain permission rules, and role bindings, which grant the permissions defined in a role to a set of users” (or Service Accounts)
| |
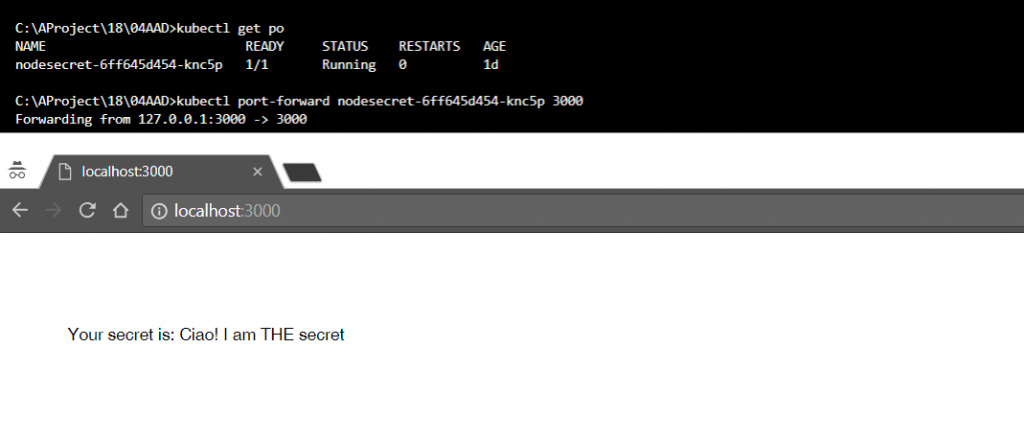
Run a Pod that gets the secret through the newly created ServiceAccount
Everything is all set, your secret is under Kubernetes leadership and you have a ServiceAccount ready to retrieve your fathomless truth.
The last step consists in hosting a web application inside a Pod, able to make use of the previously created ServiceAccount.
One advantage of retrieving secrets directly from the API Server is that, if your secret is refreshing frequently, you will always get the most recent secret. If you had used a mounted secret, you would have encountered a time delay. From the moment when the secret updates, you would have waited for kubelet synchronization period + ttl of secrets cache in kubelet.
I prepared a simple Express web application for that purpose on my GitHub: by using the officially supported Javascript client for Kubernetes, the web application retrieves the credentials to authenticate the API requests from the auto-mounted volume for the appointed ServiceAccount at the startup of the Pod.
In order to choose the correct ServiceAccount, rather than using the one by default, you should define the serviceAccountName property like this:
| |
The final result should look similar to this: